Hands-on Training: Extend and Customize the Nonprofit Starter Pack
Friday, February 28, 2014
Salesforce: Setup Audit Trail
Salesforce: Setup Audit Trail
Setup audit trail helps to track setup changes done by system administrators or users with extra permissions. This feature is very useful for organizations with multiple administrators; or even to find if you forget when to a feature is enabled.
You can view the setup audit trail history, from Setup - Security Controls - View Setup Audit Trail. It will show latest 20 entry, you also can download up to past 180 days history into CSV file. Audit Trail will show information of Date, User, Action, Section, and Delegate User (if any).
Please note that NOT ALL changes is tracked in Audit Trail, such as: Outlook Configurations, List Views and etc. Here list of type tracked in Audit trail :
- Administration
- Customization
- Security and Sharing
- Data Management
- Development
- Various Setup
- Using the application
For the complete list of changes tracked, please click here.
Salesforce: change email address without confirmation
How to change user email address without confirmation
As security measure in Salesforce, when admin change user email address (maybe in sandbox, typo or other reasons), Salesforce will send an verification email to the new email address, user need to verify by click a link in the email. Before user verify the link, email address will not change, no matter how many times you do it, even using API.
But, can admin change the email address without confirmation email? Yes, here is the trick:
- Click Edit on user detail page
- Change the email address AND check "Generate new password and notify user immediately" checkbox (all the way at the bottom of the edit screen) at the same time
- Click Save button
Thursday, February 27, 2014
Salesforce: Multiple ways to add people to a Campaign
Salesforce: Multiple ways to add people to a Campaign
I think most of Salesforce admin know, Salesforce is huge, there are so many features that we are not aware and further, Salesforce add hundred of features in every release. So, it is good to keep our knowledge up to date.
In this blog, I would like to share on how to add people in Campaigns. Most of us only know to add Campaign members from Campaign page. But, there are few more ways.
1. Add Campaign Members from Contact/Lead Reports
You can add contacts or leads from contact or lead report, make sure you or your user have this permission: Marketing User checked AND “Edit” on campaigns AND “Read” on contacts/leads AND “Read” on reports. Report should not return more than 50,000 records.

More information here.
2. Add Campaign Members from Contact/Lead Campaign History
From Contact or Lead page layout, scroll down to Campaign History related list, you can add contact or lead to a campaign, this is manual for 1 by 1 addition to member. Make sure to have this permission: “Read” on campaigns AND “Edit” on leads or contacts.

More information here.
3. Add Campaign Members from Contact/Lead View
From Contact or Lead view, you can add multiple contacts or leads, from records return in View, select all or selected records to add to campaign. Make sure to have this permission: Marketing User checked AND “Edit” on campaigns AND “Edit” on contacts or leads

More information here.
4. Add Campaign Members from Campaign itself.
This is the most common way to add campaign members and mostly used .

How to check Record Type enabled for Salesforce Profiles easily?
How to check Record Type enabled for Salesforce Profiles easily?
To check if a record type is enabled for specific profile is easy, just open the profile and scroll to Record Type Settings. You can see and edit record type for specific object. But, hang on, how about if I have 100 profiles? It mean, you need to open all 100 profiles and check it one by one. Hmm, not a good one.
As of now (Summer '13 Release), there is no way to check in Salesforce.com, which profiles are enable to specific record type. Admin have to manually open each profiles, then scroll to Record Type Settings related list to see if record type is enable for that profile. Can you imagine manual work if you have 100 profiles?
There is an idea posted in IdeaExchange, you are welcome to vote it https://success.salesforce.com/ideaview?id=08730000000BqaiAAC
Solution:
You can use Force.com IDE to identify which profiles have record type enable in specific object easier.
Here we go:
1. Open Force.com IDE (assume you have install Force.com IDE, if not Google it)2. Add objects and profiles related into Force.com IDE.
Make sure to include ALL objects you want to check into Force.com Project Contents in Force.com IDE, otherwise you will not see the record type information in the profile.

3. Open the Profile,
Yes, you need to open all profiles in Force.com IDE, but of course this is faster and easier than open each profile in Salesforce.com
Look for <recordTypeVisibilities> tage, you will see <visible> and <default> tags inside.
Record Type with visible = true is Enabled for that profile; and for default = true is default record type when user create new record in Salesforce.com

Next, can we update using Force.com IDE?
Yes, you can just simply change the value from false to true; or from true to false.
Once you save in Force.com IDE, it will save in Salesforce.com instantly.

Have fun....
Tuesday, February 25, 2014
Salesforce Sandbox Refresh
Salesforce Sandbox Refresh & How to refresh salesforce sandbox
Available in: Enterprise, Unlimited, and Database.com Editions only
Permission to view sandbox: “View Setup and Configuration”
Permission to create, refresh, activate, and delete sandbox: “Modify All Data”
From Spring '13 release, newly created sandboxes have the default email deliverability setting System email only. The System email only setting is especially useful for controlling email sent from sandboxes so that testing and development work doesn't send test emails to your users.
From Summer '13 release, you can create sandbox Template to choose data included only for Full sandbox.
You can refresh Full Sandbox every 29 days.
You can refresh Developer & Configuration Only Sandbox once a day.
Sandbox Status:
Login to Salesforce sandbox, from https://test.salesforce.com by appending .sandbox_name to their Salesforce usernames. For example, if a username for a production organization is user1@acme.com, and the sandbox is named “test”, then the modified username to log into the sandbox is user1@acme.com.test.
Once refresh, sandbox organization ID will be changed and may appear in different instance, e.g. cs6, cs3, cs12, etc.
Refresh link will be visible in a sandbox when it is eligible for refreshing.
Activate link to activate a refreshed sandbox. Activating a refreshed sandbox replaces the existing sandbox with the refreshed version. This permanently deletes the existing version and all data in it.
Few important date and time related to sandbox refresh
- Requested: date and time when admin click Refresh link
- Finished : date and time when Salesforce finish copying data to new sandbox
- Activated: date and time when admin click Activate link, old sandbox will be delete
- Copied On: date and time when Salesforce provision newly refresh sandbox and ready to use

For more information on sandbox, see this documentation.
Permission to create, refresh, activate, and delete sandbox: “Modify All Data”
From Spring '13 release, newly created sandboxes have the default email deliverability setting System email only. The System email only setting is especially useful for controlling email sent from sandboxes so that testing and development work doesn't send test emails to your users.
From Summer '13 release, you can create sandbox Template to choose data included only for Full sandbox.
You can refresh Full Sandbox every 29 days.
You can refresh Developer & Configuration Only Sandbox once a day.
Sandbox Status:
- Copying, the initial creation stage. When you create (or refresh) a sandbox, Salesforce copies the configuration and data you specify to the sandbox. A sandbox in the “Copying” stage is not yet ready for use. Copy time depends on the size of the data, and can take several hours.
- Ready for use, Salesforce finished copying data to the sandbox, and you can log into the sandbox or run application tests on the sandbox.
- Replacement Ready, this status indicates Salesforce has a copy of your object data and is ready for you to activate the sandbox so you can use it.
- In use, sandbox already activated and in use.
Login to Salesforce sandbox, from https://test.salesforce.com by appending .sandbox_name to their Salesforce usernames. For example, if a username for a production organization is user1@acme.com, and the sandbox is named “test”, then the modified username to log into the sandbox is user1@acme.com.test.
Once refresh, sandbox organization ID will be changed and may appear in different instance, e.g. cs6, cs3, cs12, etc.
Refresh link will be visible in a sandbox when it is eligible for refreshing.
Activate link to activate a refreshed sandbox. Activating a refreshed sandbox replaces the existing sandbox with the refreshed version. This permanently deletes the existing version and all data in it.
Few important date and time related to sandbox refresh
- Requested: date and time when admin click Refresh link
- Finished : date and time when Salesforce finish copying data to new sandbox
- Activated: date and time when admin click Activate link, old sandbox will be delete
- Copied On: date and time when Salesforce provision newly refresh sandbox and ready to use

For more information on sandbox, see this documentation.
Monday, February 24, 2014
What are Sandbox templates?
What are Sandbox templates?
The Summer ’13 release includes a couple major changes for sandbox users: templates and a new look that makes it even easier to create and manage your sandboxes.
Sandboxes contain copies of your organization’s configuration and (optionally) data. Use sandboxes for training or to test, configure, and deploy changes to a production organization. Full sandboxes are particularly useful for development teams to coordinate testing and deployment to production organizations.
Previously, when you created a Full sandbox, all of your organization’s data was copied to the sandbox. Now, Sandbox templates let you pick-and-choose specific objects and data to copy to a Full sandbox, save your preferences, and then reuse the template for new Full sandboxes.
Why Use Templates?
Sandbox templates:
- Give you the ability to keep sensitive data from a Full sandbox.
- Control the size of a Full sandbox. Smaller sandboxes are created and refreshed more quickly than large ones.
- Maintain multiple, reusable templates for different use-cases and development teams.

Sandboxes are now easier to use, too…
The Summer ’13 release also includes an enhanced Sandbox user interface.
The new pages:
- Tell you how many of each sandbox license you have (and how many are in use).
- Provide more information about each type of sandbox to help you decide which one to use.
- Walk you through the steps to create a new sandbox.
- Include Sandbox Templates and Sandbox History tabs with detailed information to help you manage your templates and sandboxes

Thursday, February 20, 2014
What is Apex?
What is Apex?
Apex is a strongly typed, object-oriented programming language that allows developers to execute flow and transaction control statements on the Force.com platform server in conjunction with calls to the Force.com API. Using syntax that looks like Java and acts like database stored procedures, Apex enables developers to add business logic to most system events, including button clicks, related record updates, and Visualforce pages. Apex code can be initiated by Web service requests and from triggers on objects.

When Should I Use Apex?
The Salesforce prebuilt applications provide powerful CRM functionality. In addition, Salesforce provides the ability to customize the pre built applications to fit your organization. However, your organization may have complex business processes that are unsupported by the existing functionality. When this is the case, the Force.com platform includes a number of ways for advanced administrators and developers to implement custom functionality. These include Apex, Visualforce, and the SOAP API.
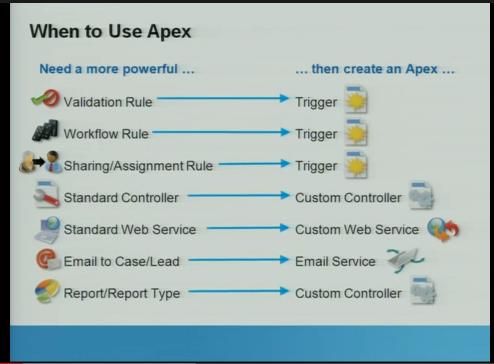
Apex
Use Apex if you want to:
• Create Web services.
• Create email services.
• Perform complex validation over multiple objects.
• Create complex business processes that are not supported by workflow.
• Create custom transactional logic (logic that occurs over the entire transaction, not just with a single record or object.)
• Attach custom logic to another operation, such as saving a record, so that it occurs whenever the operation is executed,regardless of whether it originates in the user interface, a Visualforce page, or from SOAP API.
Visualforce
Visualforce consists of a tag-based markup language that gives developers a more powerful way of building applications and customizing the Salesforce user interface. With Visualforce you can:
• Build wizards and other multistep processes.
• Create your own custom flow control through an application.
• Define navigation patterns and data-specific rules for optimal, efficient application interaction.
SOAP API
Use standard SOAP API calls if you want to add functionality to a composite application that processes only one type of record at a time and does not require any transactional control (such as setting a Savepoint or rolling back changes).
What is Visualforce?
What is Visualforce?
Visualforce is a framework that allows developers to build sophisticated, custom user interfaces that can be hosted natively on the Force.com platform. The Visualforce framework includes a tag-based markup language, similar to HTML.
In the Visualforce markup language, each Visualforce tag corresponds to a fine-grained user interface component, such as a section of a page, a related list, or a field. The behavior of Visualforce components can either be controlled by the same logic that is used in standard Salesforce pages, or developers can associate their own logic with a controller class written
in Apex
Where Can Visualforce Pages Be Used?
Developers can use Visualforce pages to:
• Override standard buttons, such as the New button for accounts, or the Save button for contacts
• Override tab overview pages, such as the Accounts tab home page
• Define custom tabs
• Embed components in detail page layouts
• Create dashboard components or custom help pages
• Customize, extend, or integrate the sidebars in the Salesforce console (custom console components)
Tuesday, February 18, 2014
Chatter usage and activity report
Chatter usage and activity report
For organisation using Chatter, you may need and interested to know how Chatter usage in your company.
1. Chatter Usage Dashboards
This is free app from AppExchange, you can install from this link
From this dashboard you can see:
- top 10 most popular users
- top 10 most popular groups
- number of chatter groups (private vs public)
- total User feed & group feed
- top users post to group
- etc

2. Chatter Activity and Influence report
Create custom report type
Click on Setup - Create - Report Types - New Custom Report Type and choose "Chatter Activity" object. Give it a name "Chatter Activity and Influence" and store it in the folder of your choice. You can then go to the Reports Tab and find the report type you just created and click on Create.

Sunday, February 16, 2014
Salesforce "Email Privileges Revoked" error message
Salesforce "Email Privileges Revoked" error message
When you write apex code in Salesforce to send email in Sandbox instance, you may find error "Email Privileges Revoked" error message.

You may never see this error earlier. What is the caused?
As per Spring'13, Salesforce have added a way for you to control the type of email your organization sends, with the new Access level setting in Setup > Administration Setup > Email Administration > Deliverability.

While you typically won’t change this setting day-to-day, these options can be useful when you need to temporarily suspend outbound email or when you’re working with sandboxes, for example:
- No access: Prevents all outbound email to and from users.
- System email only: Allows only automatically generated emails, such as new user and password reset emails.
- All email: Allows all types of outbound email. Default for new, non-sandbox organizations.
- Newly created sandboxes default to System email only.
- Sandboxes created before ’Spring 13 default to All email.
You may not be able to edit the Access level if salesforce.com has restricted your organization’s ability to change this setting.
Summary: by change access level to "All email", it should solve the issue in Sandbox.
Saturday, February 15, 2014
Improve Salesforce report performance
Salesforce.com report is a simple, yet very powerful feature. Out-of-the-box, it come with multiple type of reports, and admin can create more custom report type as needed. With report builder introduce few years back, it even easier to use and more user friendly.
But, sometimes you may found that report take sometimes to load, or time-out (although this is very rare happened).
What is the caused?
1. Too many columns in report
Just add columns as needed. More columns to display will take more time to run report. You also can hide details, when it needed, just click "Show Details" button.
2. Too many records
Set report filter criteria correctly and efficiently, you can add multiple criterias and time frame.
3. Inefficient filters
Contain and Does Not Contain take longer time to load report.
Report using AND will load faster than OR.
If you have tune everything above and it still slow, you can schedule report for future run and email it to you daily or weekly.
For more information, watch this YouTube video.
Friday, February 14, 2014
How to restrict sharing access in Salesforce?
We often heard that business would like to restrict x number of users to
access Account, while open it to rest of users. How we can do that in
Salesforce?
However in Salesforce, it is the other way round. You need to specify who can access an object, NOT about who cannot access an object.
If your company decide not to give access to anyone in company (to view or edit an object), Organization-Wide Defaults (OWD) should be set to Private, then add sharing rule for that object based on: Criterias, Public Groups, Roles or 'Roles and Subordinates'.
If OWD is set to Private or Public Read-Only. It will be shared in following rule:

To investigate who can access a record, system admin can click on 'Sharing' button in record detail. Then, click 'Expand List' to get more details on user being shared and why they being shared.
However in Salesforce, it is the other way round. You need to specify who can access an object, NOT about who cannot access an object.
If your company decide not to give access to anyone in company (to view or edit an object), Organization-Wide Defaults (OWD) should be set to Private, then add sharing rule for that object based on: Criterias, Public Groups, Roles or 'Roles and Subordinates'.
If OWD is set to Private or Public Read-Only. It will be shared in following rule:
- Role Hierarchy, any user in higher role hierarchy of record owner will be able to access the record
- Sharing Rule, any user and user in higher role hierarchy of users being shared in Sharing Rule will be able to access the record
- Manual Sharing, owner or user in higher role hierarchy of record owner, will be able to share records owned.

To investigate who can access a record, system admin can click on 'Sharing' button in record detail. Then, click 'Expand List' to get more details on user being shared and why they being shared.
Thursday, February 13, 2014
Salesforce Campaign field do not show in Lead page layout
A user come to me and ask, "Why the Campaign field in Lead page disappear after create a new lead?"
Hmmm... as system admin, what will you check?
- Make sure Campaign still exist in page layout - checked
- Check Field-Level Security for particluar user profile - checked
User still do not see Campaign field in Lead after it saved or when he edit a Lead, but it is visible when user create new Lead. After some finding, it is designed by default from Salesforce.com
Here is the explanation:
1. The Campaign lookup field on the lead page only available when user create new Lead.

2. It will disappears after a new lead is created because the purpose of this field is to make it easier for the user when creating a new lead to associate an existing campaign while on the lead edit screen.

3. Upon this new lead creation if a campaign is associated from this lookup field, it will be shown in Campaign History related list. So, user can add more campaign from Campaign History related list in Lead Page Layout.

If we look to the data structure, Lead Id is a field in CampaignMember object.
Setup > Customize > Campaigns > Campaign Members > Fields
When a Lead is converted, the most recently associated campaign is brought over to the Opportunity Campaign Source field upon conversion.
Tuesday, February 11, 2014
Salesforce Custom Label
Custom Label maybe not so popular among Salesforce administrator compare
to other feature, such as: workflow, formula field and so on. Custom
Label enable developers to create multilingual applications by
automatically presenting information in a user's native language from
Apex class or Visualforce page.
Not only for developers, Custom Label actually also available for system administrators to be used in formula field. A value from a formula field can be depend on value from custom label referred, when display in page layout, it will be displayed based on language selected in user detail. Please note if you want to set Custom Label in multi-language, you need to enable Translation Workbench. To enable Translation Workbench, click Your Name | Setup | Administration Setup | Translation Workbench | Translation Settings and add languages to be supported.
To create Custom Label, click Your Name | Setup | App Setup | Create | Custom Labels. You only can add translation language for a custom label based on languages supported in Translation Workbench.
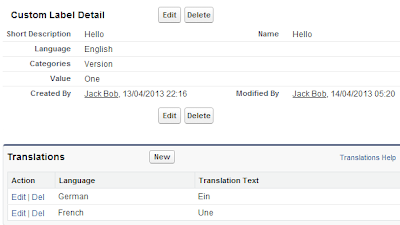
We can find Custom Label in Salesforce Global Variable start with $Label

And this is the final formula, it is just $Label.Label_Name

Here more information about Custom Label from Salesforce.
Sunday, February 9, 2014
Delete Campaign in Salesforce
A user come to me that she do see delete button in a campaign she create wrongly.
As usual, I check user profile and page layout.
- User profile have delete permission on Campaign object - checked
- Page layout have delete button - checked
So, what is the caused?
Finding.... campaign is not the same with other object. You need to enable "Marketing User" for particular user to be able to see that 'Delete' button.
Click Your Name | Setup | Manage users | User | Look up for the user's name | Edit | Enable the marketing user checkbox | Save.
The Marketing User check box on the user profile page indicates whether or not a user has the right to create and manage campaigns including:
Here is the knowledge article in Salesforce.
As usual, I check user profile and page layout.
- User profile have delete permission on Campaign object - checked
- Page layout have delete button - checked
So, what is the caused?
Finding.... campaign is not the same with other object. You need to enable "Marketing User" for particular user to be able to see that 'Delete' button.
Click Your Name | Setup | Manage users | User | Look up for the user's name | Edit | Enable the marketing user checkbox | Save.
The Marketing User check box on the user profile page indicates whether or not a user has the right to create and manage campaigns including:
- Create a new campaign
- Edit an existing campaign
- Delete an existing campaign
- Update campaign statistics
- Import leads into a campaign*
- Mass update the status for members of a campaign*
- Configure advanced campaign setup to define member status values
- Run campaign reports across multiple campaigns
Here is the knowledge article in Salesforce.
Saturday, February 8, 2014
Salesforce change account owner
Do you know or realize, when account owner is changed manually through salesforce UI the new owner will also gain ownership of
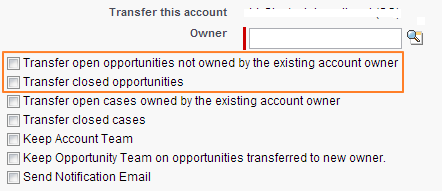
But, if you change the account owner through API, or API tool such as: Data Loader, only the Account Owner is changed. It will not change owner of contact, opportunity and other object related.
Here are two Salesforce document related ownership change:
- How do I change Account Ownership using the Data Loader?
- How to Change the Record owner using the Data Loader?
- all notes and open activities for this account (completed activities will not be transferred)
- all contacts tagged to account owned by old owner
- all opportunities tagged to account (including closed opportunities if you select the "Transfer closed opportunities" and opportunity owned by different owner if you select "Transfer open opportunities..." as screenshot below
But, if you change the account owner through API, or API tool such as: Data Loader, only the Account Owner is changed. It will not change owner of contact, opportunity and other object related.
Here are two Salesforce document related ownership change:
- How do I change Account Ownership using the Data Loader?
- How to Change the Record owner using the Data Loader?
Friday, February 7, 2014
Salesforce Archived Activities
One day, a user come to me, "Why I do not see some of my activity
history in report, although it is visible in the page layout related
list from an object" ?
This is because Salesforce archives activities (tasks and events) that are over a year old. Activity archive criteria:
If you are using Data Loader, you need to select Export All instead of Export, and if using other API tool, make sure it call queryAll() instead of query() function.
You can also filter on the isArchived field to find only the archived objects. You can update or delete archived records, though you cannot update the isArchived field. If you use the API to insert activities that meet the criteria listed below, the activities will be archived during the next run of the archival background process.
Click here for more information on archived activities.
This is because Salesforce archives activities (tasks and events) that are over a year old. Activity archive criteria:
- Events with an ActivityDateTime or ActivityDate value greater than or equal to 365 days old
- Tasks with an IsClosed value of true and an ActivityDate value greater than or equal to 365 days old
- Tasks with an IsClosed value of true, a blank ActivityDate field, and a create date greater than or equal to 365 days ago
If you are using Data Loader, you need to select Export All instead of Export, and if using other API tool, make sure it call queryAll() instead of query() function.
You can also filter on the isArchived field to find only the archived objects. You can update or delete archived records, though you cannot update the isArchived field. If you use the API to insert activities that meet the criteria listed below, the activities will be archived during the next run of the archival background process.
Click here for more information on archived activities.
Thursday, February 6, 2014
Salesforce Account Team Member and Account Share
Account Team Member and Account Share only available in Enterprise and
Unlimited edition (included Developer edition). An account team is a
team of users that work together on an account. You can add a user into
Account Team manually from Account Team related list in Account Page
Layout.


After click Add button, you can specify Account Access, Contact
Access, Opportunity Access, Case Access, and Team Role. If your default
sharing in OWD is Private for that object, you will see Private, Read
Only, and Read/Write option in picklist. You can add up to 5 users every
time add team member manually.
But, if you need to add users into hundreds of account team member, manual process is not fun.
So, here is the solution. Use Data Loader to mass create AccountTeamMember records and AccountShare records.
1. Account Team Member
The API name is AccountTeamMember, you need to populate following fields when mass insert into AccountTeamMember:
- AccountId
- UserId
- TeamMemberRole
Note: creating this record will not allow user added into
AccountTeamMember to access Contact, Opportunity, Case if the sharing
setting is Private. TeamMemberRole value can be different with values
defined in Team Role.
Purpose: it will show user added into Account Team related list.
2. Account Share
The API name is AccountShare, you need to populate following fields when mass insert into AccountShare:
- AccountId
- UserOrGroupId
- AccountAccessLevel
- CaseAccessLevel [optional]
- ContactAccessLevel [optional]
- OpportunityAccessLevel [optional]
You can set Private, Read Only, and Read/Write in above fields optional if default sharing in OWD is set to Private.
Note: user added into Account Share will be able to access Case,
Contact and Opportunity records with Read Only or Read/Write
permission, even it is not shown in Account Team related list.
Here is more information on mass create manual sharing rules with the Data Loader, click here.
Wednesday, February 5, 2014
Mass upload/insert non-English characters to Salesforce
We can mass upload / insert data to Salesforce easily using Data Loader
or other API tool. But, if we get the data in Excel file with
non-English characters, non-English characters will be come ?? if we
save it to CSV file directly from Ms Excel.
To able to upload in non-English characters, the file should be in UTF-8 and here is a step by step procedure that needs to be done since it is a limitation of Excel to save non-English character to csv file.
[ MS Excel ]
1. Open the *.xlsx file from MS Excel
2. Click menu > Save As
3. Put any name for the file and choose "Unicode Text (*.txt)" for "Save as type :" and Click Save
[ MS Notepad ]
4. Open the unicode text file using Microsoft Notepad. Some characters can appear as a box, however, this is because Notepad cannot display some unicode characters, so you can ignore this at this point.
5. It must be the tab delimitered file. Replace tabs with comma (,)
- select tab character by dragging the character between two column headers and press Ctrl+C
- Replace all tab characters with comma using Replace function (Ctrl+H)
6. In notepad, Click Save As
7. Put a filename and change Encoding: to "UTF-8"
8. Click Save.
[ Windows File Explorer]
9. Change the file extension from "*.txt" to "*.csv". The file icon should be changed to MS Excel now. If it is not changed, check Windows Folder options. (Windows Start menu > Control Panel > Folder Options > View tab > uncheck "Hide extensions for known file types"). This will show the file extensions. Try changing the file extension again.
[ MS Excel ]
10. Open this CSV file from Excel and verify if the data is okay.
*** Even if you find any problem in this step, you should NOT save the file from Excel. It will cause the encoding problem!! Just check the data only in Excel. If you see a data problem at this stage, fix the data from the original spreadsheet and repeat the steps again. Or, you can change it from Notepad but should ensure that the file is saved as UTF-8 format.
You can download sample csv file with non-English characters saved in UTF-8 encoding here.
Tuesday, February 4, 2014
Salesforce Time-Dependent Workflow and Entry Criteria
Time-Dependent Workflow is a very nice feature out-of-the-box from
Salesforce. You can easily configure it to do action such as: create
task, send email alert, field update and send outbound message. The
actions will only trigger when a certain date or hour hit as it is
configured.
Actions for Time-Dependent Workflow is exactly the same with Immediate Workflow, and you can share the same actions between Time-Dependent Workflow with Immediate Workflow, depend on your business needs, even to combine Time-Dependent and Immediate workflow in the same workflow rule.
One thing you need to note when create Time-Dependent Workflow is the Evaluation Criteria, make sure it is set to created or created, and any time it’s edited to subsequently meet criteria only. Created, and every time it’s edited will NOT allow you to have Time-Dependent Actions.

I get a request from my user to change a running Time-Dependent Workflow from 7 days before Birthdate to 14 days before Birthdate. Here is the step:
1. Screenshot existing Time-Dependent Workflow with the actions (for backup purpose)
2. Deactivate the workflow
3. Remove all existing actions in that Time-Dependent Workflow
4. Edit Time-Dependent Workflow and you will be able to modify the day to 7 days
5. Add back all existing actions for that Time-Dependent Workflow
6. Activate the workflow back
Few items to note:
1. All existing data will be NOT trigger again for Time-Dependent workflow, because it already met the entry criteria earlier. So, if your Entry Criteria is 'Evaluate the rule when a record is created, and any time it’s edited to subsequently meet criteria', you need to make the record to 'meet' the criteria again:
2. Monitoring, you can monitor record queue to be triggered for Time-Based Workflow from Setup - Administration Setup - Monitoring - Time-Based Workflow. You can select some criteria to monitor the queue or just leave all to --None-- and hit Search button.
Actions for Time-Dependent Workflow is exactly the same with Immediate Workflow, and you can share the same actions between Time-Dependent Workflow with Immediate Workflow, depend on your business needs, even to combine Time-Dependent and Immediate workflow in the same workflow rule.
One thing you need to note when create Time-Dependent Workflow is the Evaluation Criteria, make sure it is set to created or created, and any time it’s edited to subsequently meet criteria only. Created, and every time it’s edited will NOT allow you to have Time-Dependent Actions.
I get a request from my user to change a running Time-Dependent Workflow from 7 days before Birthdate to 14 days before Birthdate. Here is the step:
1. Screenshot existing Time-Dependent Workflow with the actions (for backup purpose)
2. Deactivate the workflow
3. Remove all existing actions in that Time-Dependent Workflow
4. Edit Time-Dependent Workflow and you will be able to modify the day to 7 days
5. Add back all existing actions for that Time-Dependent Workflow
6. Activate the workflow back
Few items to note:
1. All existing data will be NOT trigger again for Time-Dependent workflow, because it already met the entry criteria earlier. So, if your Entry Criteria is 'Evaluate the rule when a record is created, and any time it’s edited to subsequently meet criteria', you need to make the record to 'meet' the criteria again:
- Update the record NOT to meet the criteria, then update it back to meet the criteria.
- Example: if we are using Rule Criteria "Birthdate NOT EQUAL TO null", we need to make it to null first (make sure to backup first), then populate the original Birthdate back, so it will meet the criteria again.
2. Monitoring, you can monitor record queue to be triggered for Time-Based Workflow from Setup - Administration Setup - Monitoring - Time-Based Workflow. You can select some criteria to monitor the queue or just leave all to --None-- and hit Search button.
Saturday, February 1, 2014
How to report Chatter records following by users?
As of Salesforce Spring '13 release, maximum people and records a user
can follow in Chatter is 500. Once a user hit 500, user unable to follow
any user or record.
Question, how to check number of people + records has been followed? Easy answer, click on user profile and it will show in right panel of count and items "Following". Then, you can click "Show All (number)" to see all records and people that user are following.

But, is there anyway to list all items following for all users? We cannot find in Chatter reports on this. If you are familiar with SOQL or Data Loader, this is possible...
The object that stored all 'following' is EntitySubscription.
EntitySubscription represents a subscription for a user following a record or another user. A user can subscribe to a record or to another user. EntitySubscription are available in API version 18.0 and later.
Here is the simple query
Select e.Id, e.SubscriberId, e.ParentId From EntitySubscription e order by e.SubscriberId
SubscriberId here is UserId and ParentId is any objects or users following.
If you do not want to auto-following records you created (so you not easily hit max 500), you can configure it from: Setup - Personal Setup - My Chatter Settings - My Feeds. Uncheck 'Automatically follow records that I create'.
There are also application in AppExchange you can install to auto-unfollow Chatter items based on rule set created by Salesforce Lab:
- http://appexchange.salesforce.com/listingDetail?listingId=a0N30000003IX0UEAW
- http://appexchange.salesforce.com/listingDetail?listingId=a0N30000003GGRwEAO
Question, how to check number of people + records has been followed? Easy answer, click on user profile and it will show in right panel of count and items "Following". Then, you can click "Show All (number)" to see all records and people that user are following.
But, is there anyway to list all items following for all users? We cannot find in Chatter reports on this. If you are familiar with SOQL or Data Loader, this is possible...
The object that stored all 'following' is EntitySubscription.
EntitySubscription represents a subscription for a user following a record or another user. A user can subscribe to a record or to another user. EntitySubscription are available in API version 18.0 and later.
Here is the simple query
Select e.Id, e.SubscriberId, e.ParentId From EntitySubscription e order by e.SubscriberId
SubscriberId here is UserId and ParentId is any objects or users following.
If you do not want to auto-following records you created (so you not easily hit max 500), you can configure it from: Setup - Personal Setup - My Chatter Settings - My Feeds. Uncheck 'Automatically follow records that I create'.
There are also application in AppExchange you can install to auto-unfollow Chatter items based on rule set created by Salesforce Lab:
- http://appexchange.salesforce.com/listingDetail?listingId=a0N30000003IX0UEAW
- http://appexchange.salesforce.com/listingDetail?listingId=a0N30000003GGRwEAO
Query Chatter feed item & how the structure in Salesforce object
Salesforce admin can enable Chatter feed tracking on Salesforce object, include custom objects.
Go to Setup - App Setup - Customize - Chatter - Feed Tracking
Select object to track and tick "Enable Feed Tracking", you can select up to 20 fields.
In the background, once an object is enable for feed tracking, Salesforce will create new object end with suffix Feed (for Standard object) or _Feed (for Custom object). This is available in API version 18.0 and later.
Using SOQL, you can do this query:
Select Id, ParentId, Type, Title, Body, CommentCount, LikeCount, LinkUrl, RelatedRecordId, ContentFileName, ContentSize, ContentType From Object1__Feed
This query will return all feeds tag to Object1__c object only (see ParentId field)
Another object storing all feeds is FeedItem, this object avaiable in API version 21.0 and later.
Select Id, ParentId, Type, Title, Body, CommentCount, LikeCount, LinkUrl, RelatedRecordId, ContentFileName, ContentSize, ContentType From FeedItem Order By ParentId
This query will return all feeds tag to any objects.
See architecture below (click image to enlarge):

Notice that objectFeed object shared the same prefix with FeedItem: 0D5
If you need the screenshot in Visio file, click here


